Thứ Sáu, 18 tháng 11, 2016
Thứ Năm, 17 tháng 11, 2016
Timer Object C
***Timer Delay:
double delayInSeconds = 1.2;
dispatch_time_t popTime = dispatch_time(DISPATCH_TIME_NOW, (int64_t)(delayInSeconds * NSEC_PER_SEC));
dispatch_after(popTime, dispatch_get_main_queue(), ^(void){
NSLog(@"Do some work");
});
***Timer Repeat:
- (void)viewDidAppear:(BOOL)animated {
float delayTime = 1.0f;
if (_timerUpdate == nil) {
_timerUpdate = [NSTimer scheduledTimerWithTimeInterval:delayTime target:self selector:@selector(onTickUpdateIcon:) userInfo:nil repeats:YES];
}
[_timerUpdate fire];
}
- (void)onTickUpdateIcon:(NSTimer *)timer {
// do something...
}
- (void)viewDidDisappear:(BOOL)animated {
[_timerUpdate invalidate];
_timerUpdate = nil;
}
Thứ Ba, 25 tháng 10, 2016
Các khai báo cơ bản trong Object c
- Khai báo hằng:
#define SWITCH_TYPE ((int) 2)
#define MY_STRING_CONSTANT @"my_constant"
- Sử dụng NSArray:
Khai báo:
NSArray *arrayOne = @[@"Mercedes-Benz", @"BMW", @"Porsche",
@"Opel", @"Volkswagen", @"Audi"];
NSArray *arrayTwo = [NSArray arrayWithObjects:@"Aston Martin",
@"Lotus", @"Jaguar", @"Bentley", nil];
NSLog(@"phần tử đầu tiên: %@", arrayOne[0]);
NSLog(@"phần tử đầu tiên: %@", [arrayTwo objectAtIndex:0]);
Kiểm tra phần tử:
if ([arrayOne containsObject:@"BMW"]) {
NSLog(@"BMW is a German auto maker");
}
- Sử dụng NSMulableArray:
// khai báo
NSMutableArray *arrayOne = [NSMutableArray new];
NSMutableArray *arrayTwo = [NSMutableArray arrayWithObjects: @"Audi A6", @"BMW Z3", @"Audi Quattro", @"Audi TT", nil];
// sử dụng
[arrayOne addObject:@"new obj"];
[arrayOne removeLastObject];
[arrayOne removeAllObjects];
[arrayOne removeObjectAtIndex:0];
// Add BMW F25 to front
[arrayOne insertObject:@"BMW F25" atIndex:0];
// Remove BMW F25 from front
[arrayOne removeObjectAtIndex:0];
// Remove Audi Quattro
[arrayOne removeObject:@"Audi Quattro"];
// Change second item to Audi Q5
[arrayOne replaceObjectAtIndex:1 withObject:@"Audi Q5"];
...
Thứ Hai, 3 tháng 10, 2016
Customize UITableView
- Tạo CustomCell:
+ Tạo file xib:
+ sửa file ViewController.m:
- Set background color:
- Căn trái sperator:
- Clear Footer operator:
- Set height wrap label content:
- Set background selected:
- Khoá select
- Khoá kéo Scroll
+ Tạo file xib:
+ sửa file ViewController.m:
- (void)viewDidLoad {
[super viewDidLoad];
_uiTable.dataSource = self;
_uiTable.delegate = self;
[_uiTable registerNib:[UINib nibWithNibName:@"CustomCell" bundle:nil] forCellReuseIdentifier:@"MyCell"];
}
...
- (UITableViewCell *)tableView:(UITableView *)tableView cellForRowAtIndexPath:(NSIndexPath *)indexPath {
CustomCell *cell = [tableView dequeueReusableCellWithIdentifier:@"MyCell" forIndexPath:indexPath];
[cell.label setLineBreakMode:NSLineBreakByWordWrapping];
cell.label.numberOfLines = 0;
cell.label.text = _dataArray[indexPath.row];
cell.backgroundColor = [UIColor clearColor];
return cell;
}
...- Set background color:
- Căn trái sperator:
- Clear Footer operator:
- (CGFloat)tableView:(UITableView *)tableView heightForFooterInSection:(NSInteger)section {
// This will create a "invisible" footer
return 0.01f;
}
- (UIView *)tableView:(UITableView *)tableView viewForFooterInSection:(NSInteger)section
{
// To "clear" the footer view
return [UIView new];
}
- Set height wrap label content:
- (UITableViewCell *)tableView:(UITableView *)tableView cellForRowAtIndexPath:(NSIndexPath *)indexPath {
CustomCell *cell = [tableView dequeueReusableCellWithIdentifier:@"MyCell" forIndexPath:indexPath];
// label multi line:
[cell.label setLineBreakMode:NSLineBreakByWordWrapping];
cell.label.numberOfLines = 0;
cell.label.text = _dataArray[indexPath.row];
cell.backgroundColor = [UIColor clearColor];
return cell;
}
// wrap label:
-(CGFloat)tableView:(UITableView *)tableView estimatedHeightForRowAtIndexPath:(NSIndexPath *)indexPath {
return UITableViewAutomaticDimension;
}
- (CGFloat)tableView:(UITableView *)tableView heightForRowAtIndexPath:(NSIndexPath *)indexPath {
return UITableViewAutomaticDimension;
}
- Set background selected:
// change background color of selected cell
UIView *bgColorView = [[UIView alloc] init];
[bgColorView setBackgroundColor:[UIColor clearColor]];
[cell setSelectedBackgroundView:bgColorView];
_contentTableView.allowsSelection = NO;
- Khoá kéo Scroll
_menuTableView.scrollEnabled = NO;
Thứ Bảy, 1 tháng 10, 2016
Đặt file .xib làm màn hình chính của ứng dụng
1. tạo project
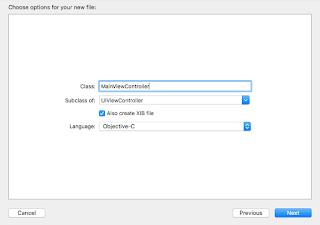
2. New file như hình
3. Sửa nội dung file AppDelegate.m
...
2. New file như hình
#import "AppDelegate.h"
#import "MainViewController.h"
@interface AppDelegate ()
@property (strong, nonatomic) MainViewController *mainViewController;
@property (strong, nonatomic) UINavigationController *navController;
@end
@implementation AppDelegate
- (BOOL)application:(UIApplication *)application didFinishLaunchingWithOptions:(NSDictionary *)launchOptions {
// Override point for customization after application launch.
_window = [[UIWindow alloc] initWithFrame:[[UIScreen mainScreen] bounds]];
_navController = [[UINavigationController alloc] init];
_navController.navigationBarHidden = YES;
_mainViewController = [[MainViewController alloc] init];
_window.rootViewController = [_navController initWithRootViewController:_mainViewController];
return YES;
}
Thứ Tư, 24 tháng 2, 2016
Cấu hình lại đường dẫn truy cập project Laravel và bật thông báo BUG
*** Chép 2 file index.php và .htaccess trong folder public ra ngoài thư mục gốc:
*** Sửa nội dung file index.php như hình:
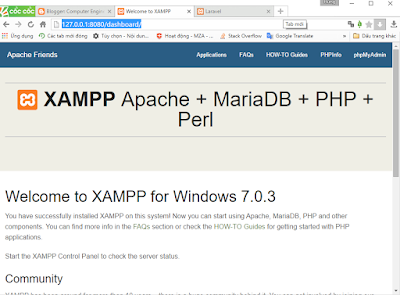
*** KIểm tra với trình duyệt:
*** Bật thông báo BUG trong Laravel khi làm việc: sửa nội dung file config/app.php chuyển dòng 'debug' => env('APP_DEBUG', false) thành 'debug' => env('APP_DEBUG', true) như hình;
*** Sửa nội dung file index.php như hình:
*** KIểm tra với trình duyệt:
*** Bật thông báo BUG trong Laravel khi làm việc: sửa nội dung file config/app.php chuyển dòng 'debug' => env('APP_DEBUG', false) thành 'debug' => env('APP_DEBUG', true) như hình;
Cấu trúc một project Laravel 5.x
*** Các file và thư mục trong một project Laravel:
*** Mô tả:
- app: Là thư mục chứa các mô hình và điều khiển các ứng dụng. App chứa Model và Controller cho ứng dụng của bạn.
- bootstrap: Thư mục này chứa các thiết lập cơ bản để bắt đầu ứng dụng.
- config: Thư mục này chứa tất cả các thiết lập cấu hình của các ứng dụng như kết nối cơ sở dữ liệu, bao gồm các lớp lõi, cài đặt email…
- database: Thư mục này chứa các mã cho các giao dịch cơ sở dữ liệu như tạo bảng, chỉnh sửa các cột, thêm hàng mặc định trong cơ sở dữ liệu…
- public: Thư mục chứa các file tĩnh (css, js, less, etc.). File index.php trong thư mục này gọi đến các tập tin đó.
- resources: Thư mục chứa các mã nguồn của ứng dụng như Views (html file), assets...
- storage: Thư mục lưu trữ dữ liệu của sessions, caches.
- tests: Thư mục này chứa tất cả các bài tests của ứng dụng.
- vendor: Thư mục này chứa tất cả các file của bên thứ ba (phụ thuộc và prepackages bổ sung cho các plugin) và các tập tin mã nguồn của Frameworl laravel.
- .env.example: File cấu hình các thông tin tài khoản mail, database,...
- .gitattributes
- .gitignore
- artisan: Là file mà laravel tạo ra để hỗ trợ chạy lệnh: php artisan.
- composer.json: Là file để cấu hình việc thao tác với composer như install hay update Laravel, thêm các file hỗ trợ...
- composer.lock:
- gulpfile.js
- package.json
- phpunit.xml
- readme.md
- server.php: Cần có để chạy lệnh: php artisan serve.
Thứ Hai, 22 tháng 2, 2016
Hướng dẫn cài đặt Laravel 5
1. Cài đặt Xampp
-
Mở file php.ini thêm dòng
extension=php_openssl.dll
Vào phần mở rộng
như hình:
-
Cài đặt biến môi trường cho php:
2.
Cài đặt composer
-
Tiến hành cài đặt bình thường:
-
Cài đặt biến môi trường cho composer:
3. Download và cài đặt Laravel
-
Giải nén vào thư mục: C:\xampp\htdocs
-
Mở cmd rồi cd tới thư mục đó gõ lệnh composer install
-
Chạy laravel:
Đăng ký:
Nhận xét (Atom)


